
Summary
 Let’s get to the point, training indoors rather than being out riding is boring but useful, and primarily for times when you cannot get out to ride. In term of budget, you can start with a low cost basic trainer and mount your bike onto it and off you go. If you want to go beyond training using your own perceived levels of effort, get a heart rate monitor (Bluetooth is easiest) and connect it with your phone or laptop. That way you can train using Apps such as Strava or Trainingpeaks to make your workouts effective.
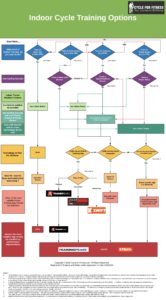
If your budget allows, and what you want to measure as part of workout increases (see below pie chart), connect Speed/Cadence sensors and by upgrading your trainer to a smart (or connected) trainer that that either measures or simulates your power output, you will be able interact with Apps such as Trainrroad or Sufferfest or use immersive Apps such as Zwift.
In terms of budget, you can spend from £150 to £2,000. The biggest outlay will be the trainer itself, followed by sensors and then there is a wide choice of free and monthly subscription based Apps. The decision tree to the right is intended to help you make those choices. A larger image is on my Pinterest board here.
Why Use Indoor Trainers
In the previous article I wrote and video’d how to set up Garmin and Wahoo cycle computers to talk to various sensors that you need if you are considering training, such as heart rate monitors, and cadence/speed sensors.
We will also talk here about measuring power using an indoor trainers as they more readily available and cheaper than the eye-wateringly expensive power meters that are used for road cycling.
So why would you want to measure these things in the first place ? When riding your bike on the road, I agree, these are nice to haves and you can train by using your own levels of fitness as indicators of how far and how hard to push yourself. You’ll recall this is called training to your perceived rate of effort (RPE) and is used to get us started and riding up to for example 20 miles in one go without having to stop.

However, if you plan to go that one step further and use cycling as your primary means to regain fitness to a level where you could easily ride one of the many sportives, charity rides, or cycle with club riders, then by measuring your heart rate, cadence (pedal speed) and possibly power, you can train much more effectively to a specific and measurable plan.
When it comes to indoor trainers, measuring your heart rate, together with speed and cadence becomes necessary if you want the best out of your training workout.
But you may ask, don’t we just swing a leg over the bike, and pedal for a while, looking at a blank wall in the garage, shouting at Jeremy Kyle, or watching our favourite boxset ? 🙂 Nice thought, but time and again I hear that indoor workouts are boring, and because you cannot manage what they cannot measure, or if you don’t feel that all that sweating is making a real difference, it is way too easy to become seriously demotivated.
Okay, if it is that boring, why bother with indoor training? The answer is that the vast majority of people who use indoor trainers, while considering this form of exercise a necessary evil, know that it helps them keep fit when the weather outside is not amenable, or just too dangerous due to ice, snow, floods, etc. Other reasons for indoor training is that you may consider the roads around you are dangerous, being full of cars, vans and lorry drivers who are “out to get you”. Or perhaps you simply haven’t yet gained the confidence to ride on the roads as you have been unwell, seriously unfit or injured and the roads just seem too daunting at this time of the year.
Either way, over the last few years a new arm of the cycling industry has popped up to help you with new Apps and advanced (or smart) indoor cycling trainers, aiming to give you immersive entertainment, and offering you the chance to have fun, realistic and effective workouts. By capturing certain data, this new industry help you understand how your performance is improving and help you avoid having to swear at Jeremy Kyle !
Types of Indoor Cycle Trainer
Having bit the bullet and decided that you want to exercise using an indoor cycle trainer, where do you start ? It very much depends on a couple of things. The first is your budget, the second what you want to achieve and how realistic you want the indoor trainer to be to road cycling. Cycling Weekly has a reasonable guide to turbo trainers, however my take is below.
Basic Trainers
If your budget is conservative, then you’ll probably be looking to get a basic trainer (from £150 to £450). This is the type where you mount your bike onto a frame, with the rear wheel pressed against a roller with either a fixed or varying resistance created either by magnets, a fan, or fluid-filled resistance unit. The good points about basic trainers are that they give you the ability to do and free workout or according to a structured plan. However there are two downsides;
(a) you cannot use them with Apps such as Trainerroad unless the trainer is vPower compatible, and you also have a speed/cadence sensor for Zwift.
(b) you cannot control the resistance, so you have to either increase the cadence or drop to a higher gears to increase power and vice versa.
Note that if you have a power meter for you bike, you can use them with the basic trainer as if you road riding, pairing the power meter to your cycle computer or via laptop/phone to one of the above cycle training Apps (we come to those later in this article).
Smart Trainers
Moving up the scale in terms of sophistication, features and hence cost, we come to smart trainers. There are two types:
- Wheel Drive
The first type if similar in operation to the basic trainer, the difference being that the resistance can be controlled and varied from your cycle computer, or more likely nowadays, cycling training Apps.
- Direct Drive
The second type, and usually top of the range, are the ‘direct drive’ trainers. These work by removing the back wheel and mounting the bike directly on the trainer. The resistance can be set by cycle computers and cycle training Apps and can simulate the feel and an create an immersive riding experience….all at a price !
Rollers
For completeness, we need to mention rollers. Rather than mounting your bike on a frame, the bike sits on a set of two rollers at the rear and a single (connected) roller on the front. As you pedal the rollers rotate, just like a rolling road that an MOT garage users to test your car, mimicking cycling on in real life and yes the acronym IRL (in real life) is used by the indoor trainer community. One last point, rollers are not for the faint hearted novice as they require you to have solid core strength and ability to concentrate.
Trainer Tips
- If you buy the type of trainer which requires you to keep your back wheel on and mount the bike onto a frame, it is essential that you use the skewer that comes with the trainer, do not use your existing skewer, if that snaps when training, it’s going to hurt…or more seriously you may injure yourself.
- Use a “riser” or similar to raise the level of the from wheel to match the back wheel, otherwise the bike will be tilted down at the front, placing strain on your hands, arms and shoulders.
- If you intend using a roller, try placing it next to a wall so that you have somewhere to touch or grab if you use your balance.
Training using Power Zones
We have mentioned that we can capture how much power you are putting through the pedals using trainers that support vPower, and this can be useful if you are training to power zones. More accurate measurements can be taken by using your existing cycle’s power meters or upgrading to a a smart trainer that measures power as part of its feature set.
This use of power becomes a core feature as you progress your fitness levels and has many athlete level training programmes concentrate on workouts that are based on your functional threshold power – or the maximum power that you can sustain over a 60 minute period, limited by strength, aerobic fitness and your body’s ability to manage the build up of lactic acid in your muscles that create the pain and cramps you feel when undertaking strenuous exercise.
When training using power thresholds on an indoor trainer it is important that you can match your power to the training plan you are following, whether that is a set resistance or the gradient of the road that you are following in one of the interactive/immersive Apps (e.g. Zwift). To help the industry developed a smart trainer mode called ‘ERG’. At first I wasn’t that excited about it, but it is now a cornerstone of my training. Here’s why.
Controlling your Trainer with ERG
This mode enables you to set a particular target power level for your workout and the trainer will set the resistance such that you pedal out this power level irrespective of your cadence. This allows you to do a workout with for example short intervals at high intensity, where all you need to is pedal at the same rate and the trainer will adjust the resistance automatically so that you achieve the required power output without having to mess about with your own gears. My Zwift user experience video shows this in action.
Connecting Indoor Cycle Trainers to Gadgets that measure your efforts
Once you have chosen your indoor trainer, we need to set up the various meters and sensors so that we can train to a plan, and afterwards make sense of our efforts.
Of course life wouldn’t be the same without technology complications. If you read my blog on connecting cycling computers to sensors you will remember that there are two technologies that allow stuff to talk to each other. One is ANT+ (owned by Garmin) and the other Bluetooth (mainstreamed by laptops, smartphones, etc). Most cycling computers will talk to cycle sensors using both technologies, but before you buy, check that they are compatible.
If you want your laptop to connect to the sensors, this is straightforward if the sensors are Bluetooth, however if they are ANT+, you’ll need a USB dongle that you plug into the computer so that you can talk to the sensors using ANT+.
If you want to connect ANT+ sensors to your phone or tablet, then this is also possible. For Android your phone may already be ANT+ enabled. If you are using iPhone/iPad, then you’ll need to buy an ANT+ accessory. See here for more information.
Once we are connected we not finished. To get an immersive experience, connect your laptop or phone/tablet to a TV placed infront of your bike. Use a high quality HDMI cable if possible. Another option is to use an Apple TV and stream from your phone, tablet or macbook to the TV via the Apple TV.
If in doubt, feel free to ask me – grant@cycleforfitness.com
Cycle Training Apps
Once we have worked out which indoor trainer to use, and connected them to sensors, if we want to follow a training plan, we need to consider if we’d like to use one or more of the various cycle training Apps.
As a starting point, create a Strava account and download the App to your smartphone. As long as you have as a minimum a heart rate monitor and speed/cadence sensor that you can do a workout on the indoor training pretty much the same as on the road.
From then on, the choices become a little complex, but let me try to simplify :
- If you would like to have a training plan with structured workouts then all the Apps offer training plans, some better than other, in my opinion in the order of functionality:
- TrainingPeaks (preferred due to (a) the comprehensiveness of the plans, (b) ability to be used with or without a coach and (c) can be used on both road and indoors)
- Trainerroad
- Sufferfest
- Zwift
- If you plan to use training plans when you are riding your bike on the road, then TrainingPeaks is the only way to go as it does both road and indoor.
- If an immersive experience (entertainment) is more important than the quality of the plans, then create the workout in Trainingpeaks and use Zwift (fun) or Sufferfest (more hardcore) for the workout.
Now here’s a thing, if you want the best of all worlds, you can get free accounts with Strava and TrainingPeaks and then buy Zwift (£12 per month) and use your TrainingPeaks workouts in Zwift for a serious, but entertaining workout. If you wish to are a data freak, or want to use a coach, buy a premium TrainingPeaks account (£11 per month). Rather than discuss each training App in this article (let’s Face it, it’s long enough!), I have created a separate article with a series of videos that show you how to use a structured workout from an App (in this instance Trainingpeaks) and use your indoor trainer with two of the most common indoor training Apps, namely Trainerroad and Zwift.
Putting it all together – the options
The good news is that once you’ve sorted out the connections, you can use both the basic and smart trainers with your cycling computer or favourite training Apps. Let’s look at the options:
- Cycling Computer with Basic Trainer. With this setup you mimic road riding. As the trainer has a set resistance, you use your gears in the same way as you would ride up an incline, choosing lower gears if you want to spin your legs, or a high gear if you want to grind it (not recommended). If you use your heart rate monitor, speed and cadence sensors, this will be picked up by the cycling computer so that you can train to a particular speed, cadence or heart rate, then upload these to your favourite cycling App (Strava or TrainingPeaks for example).
- Cycling Computer with Smart Trainer. These trainers allow you to control the resistance from your cycle computer. You’ll need first of all to load your workout onto the device from for example trainingpeaks.com or created a structured workout on the device itself. Before you buy, check that the cycling computer will connect to your sensors – the vast majority are compatible, but I have found that some devices (not to pick on them, but for example the Wahoo Elemnt) will not talk to some power meters even if they both use Bluetooth. I recently had that problem with a Bolt and Kinetic Smart trainer, meaning we had to resort to using option 3 (below) to capture power. This wasn’t a problem as we were able to merge the files from the cycling computer and the Kinetic.Fit App once they were upload to TrainingPeaks, so no big deal in the end.
- Cycle Training Apps with Smart Trainer. If you want to get more out of a basic trainer, buy one that support “vPower”. When used with indoor Apps such as Trainerroad and Zwift, the Apps can calculate your virtual power (vPower) and hence can be used with power-based workouts and simulate your road speed in their virtual worlds. Sounds geeky, but is a highly entertaining experience.
- Smart Trainers’ own Smartphone/Tablet Apps. Companies such as Tacx, Wahoo, Kurt Kinetic and others provide “companion” Apps (iPhone, iPad or Android) that connect your trainer and sensors to your smartphone/tablet enabling you to run workouts using those devices rather than a cycling computer. These Apps can also be used to create structured workouts, but you may need yet another subscription, so I’d only recommend as a last resort and would suggest using one of the Cycling Training Apps as discussed below.
Conclusion
In conclusion:
- For indoor trainers, open a Strava account, then get the smartphone App and use with a HR and speed/cadence as a minimum.
- Choose a sturdy indoor trainer, preferably one that supports vPower to future proof your investment.
- Get a TrainingPeaks account (or Trainerroad) and link that to Strava so you can start to train to a plan. If you need entertainment to keep motivated, buy a monthly Zwift subscription…or Sufferfest if you want something more realistic and hardcore.
- As a next step up the ladder of complexity, but really a nice to have, instead of buying a basic indoor trainer, spend the extra few pounds and get a smart indoor trainer so that your training rides can simulate riding outdoors and you can train according to power zones.
- As for cycling computers, they can be used with your indoor trainer, but check the model and the indoor trainer you plan to buy are compatible, ie Bluetooth, ANT+ or both.
Still confused, then get in touch and I’ll walk you through your options based on how you plan to regain fitness and wellbeing.