Okay, so we’ve all got our own ideas on eating when cycling, however from my own perspective it can be either too much, too little or just the wrong stuff than what our body needs to keep us going. Just for the record, I am not a sports nutritionist, but feel that I can give you my perspective and my strategy based on many years and many thousands of miles of riding.
So first things first. Let’s look at what we need before we ride, what we need when on the go, and what we need after riding. Just to be sure, I am assuming you are reading this from the view of what to eat when “riding with intent”, rather than the 2 mile commute or ride to the shops.
Before we ride we need to “fuel up”. It may seem common sense that anything goes… so let’s have a massive fry up ! 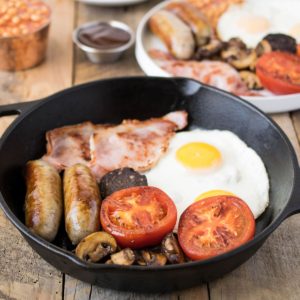 But hold on before committing those rashers of bacon, fried eggs and snorkers to the pan, in reality, what we need are slow release (ie unrefined) carbohydrates such as oats, muesli or bran….food that our bodies will find hard to break down and hence will last several hours. So to your obvious disappointment, fry ups are out. Would I recommend a smoothy or fruit juice ? Only if combined with low release foods to offset the high sugar content which would otherwise give you a quick hit but will soon send your blood sugars to the floor.
 But hold on before committing those rashers of bacon, fried eggs and snorkers to the pan, in reality, what we need are slow release (ie unrefined) carbohydrates such as oats, muesli or bran….food that our bodies will find hard to break down and hence will last several hours. So to your obvious disappointment, fry ups are out. Would I recommend a smoothy or fruit juice ? Only if combined with low release foods to offset the high sugar content which would otherwise give you a quick hit but will soon send your blood sugars to the floor.
 Is pasta or rice or other processed carbs for breakfast good ? This depends on how much carbohydrate your body can cope with before getting cramps. I have seen athletes neck bowls of the stuff, so it must be okay yeah…but to a point. All carbs are not equal, with simpler carbs less likely to cause cramping issues than those with a high fibre content, but consider your stomach to be a funnel with a wide cone at the top and a small pipe at the bottom. In general, most of us have a small pipe, meaning that if we keep shoveling in the carbs before we can use it, our funnel overflows….ie cramps. As athletes have trained their guts to use carbs over many months or years, their “pipe” is larger, meaning that they process and so can cope with much more carb intake than the recreational cyclist. Get the idea? Not to stress the point, this is why if you gorge yourself on high carb training energy bars, gels and the like, it is going to backfire…sometimes literally !
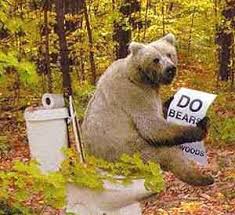
I got talking to a guy during the London 100 ride a few years ago; we were waiting at the bottom of a steep climb, stopped because it was a bottleneck and the guy had a twisted expression and beads of sweat across his brow. I asked if he was okay and he told me that he was suffering a little from the energy gels he’d consumed. I asked how many, and he said nine…we’d only been going a couple of hours. He certainly proved that cramps come with overdoing the gels as certain as ..well now you get the bear picture.
In some circumstances it is necessary to do a “fasted” workout….but these are generally limited to 2 hours. This doesn’t preclude a coffee or two before setting off, but no carbs – this has been shown to be a good way to shock your body into using your fat stores more effectively. If you intend doing a fasted ride, take some food with you just in case you need it.
During Rides. So having had a hearty breakfast what should you expect to be able to eat whilst riding/training. Again, it depends. On long endurance rides where you will be in the saddle for several hours, pretty much anything goes as along as you match your carb intake too your level of exercise (the amount you burn). There are many variables such as lean muscle and fat mass, metabolic efficiency and environmental factors, but the typical person can tolerate approximately about 60grams of glucose or 90grams of fructose per hour. An energy gel is 21-26 grams per sachet (or approx 100 calories), so when you read take 3 per hour, that’s 300 calories you are consuming per hour and you maximum intake the average person can cope with. so you’d better be burning a lot of calories and be able to cope with a high carb intake…which is why I hear so many seasoned cyclists limiting their use to be being the “emergency gel”, to be used only as a last resort if you run out of steam before the end of a ride (it’s called ‘bonking’, or “the man with the hammer visits you”).
On a long ride I will typically take a bag of almonds, some cereal/muesli bars and bananas (not only a good source of natural carbs, but a great source of potassium that your muscles and digestive system need during exercise). At stops I’ll try to find a flapjack or granola bar rather than cake, or if you are on a budget, take a tuna sandwich with you, or homemade flapjacks – and consider that gels and bars are there for convenience, but at a cost. If it is warm, remember to eat sources of salt, crisps, salted nuts, etc.
Also remember that you need to drink water, preferably with zero calorie electrolytes. I have stopped using energy powders in my water as these can quickly and unthinkingly push you over your hourly carb intake. I usually consume about a litre every hour (more in the summer), not only keeping me well hydrated, but also improving my feeling of well being and lack of grumpiness. A good study on hydration can be found here.
If the ride requires a lot of long hill climbing then I take a bag or two of Jelly Babies or Rowntrees Randoms – both small but effective doses of quick release energy, and more calcium gram for gram than milk 🙂 If you like the idea of sweets, but prefer a natural product, I can recommend guava energy bars as an easily digestible alternative – though not cheap.
On short ride, I will just take a banana and perhaps an energy bar as an emergency backup. There is a line of thought that if you are riding for less than two hours then you shouldn’t eat during the ride, including that mid-ride cake…but I’m sorry that goes out of the window if it is a “Sunday Social” ride of course !
I have been deliberately non-prescriptive in the amounts you can eat because how much or little you consume is so dependent on the factors already described, so is a bit hit and miss; however as a guide, look at how many calories you are burning during an exercise. As an example I’m 55 years old and weigh 75Kg, and typically burn approx 500 calories an hour. My maximum burn was 3,500 calories on a ride over 100 miles with 2,800 metres of climbing, so I could afford a few pork pies that day, but when I started I burnt only 250-300 calories an hour as I was on beta blockers and hence couldn’t exercise intensely. So don’t worry if you are a little heavier than you want to be, perhaps you are just starting out on your journey to fitness, then you may be burning 600 or 700 calories per hour on intense rides, unless you are on medication. Use Strava or TrainingPeaks or whatever App you use to work out what you are burning, and try to eat well, but less than what you burn….let’s keep the maths simple. In essence, if you are looking to lose a little weight by cycling, then an hour’s ride may not mean that you can indulge yourself. As a guideline, a slice of pizza can be approximately 400 calories and a couple of beers approximately 160 calories a pint!, so it is quite easy to undo all that hard work.
After a ride I advise taking a protein drink or bar within 20 minutes of finishing. This is important as our bodies will begin to repair itself from the strain you placed it in during the exercise (which is also why rest between exercise is so essential) and if there is no fuel in your body it will take energy from your muscular glycogen stores (which take a long time to replenish), so it is important to give your body a good dose of protein to use instead. If you enjoy milk, go for that, otherwise there are plentiful choices of post-exercise protein drinks and bars you can get from your local bike shop or on-line.
So eat normally, keep to unprocessed, natural foods and take solace from the fact that each time you cycle you are training your gut to be able to cope better with carbs, and if you are not replacing the calories burned with little (or not so little) treats….then you will see a drop in weight, a greater tolerance to processed carbohydrates and improved metabolism with regard to handling sugars.
Eat well and enjoy your cycling !