I hear it is warming up ?

Apparently it has been a little on the warm side in the UK the last few days, some might say even “it ain’t half hot!”. If you are sitting there wondering what it might be like to cycle in this weather, perhaps this might be your first summer of cycling, or you’ve been unfortunate never to experience the joys of cycling in the sunshine, it would be remiss of me not to address not only the pleasure but also a few snippets of advice on how to prepare for cycling during a hot day.
So to begin with, you draw the curtains (or whatever) and smile at a cloudless blue sky, the birds are singing, bees are humming and the world is spinning on a slightly more relaxed axis. Life is good.
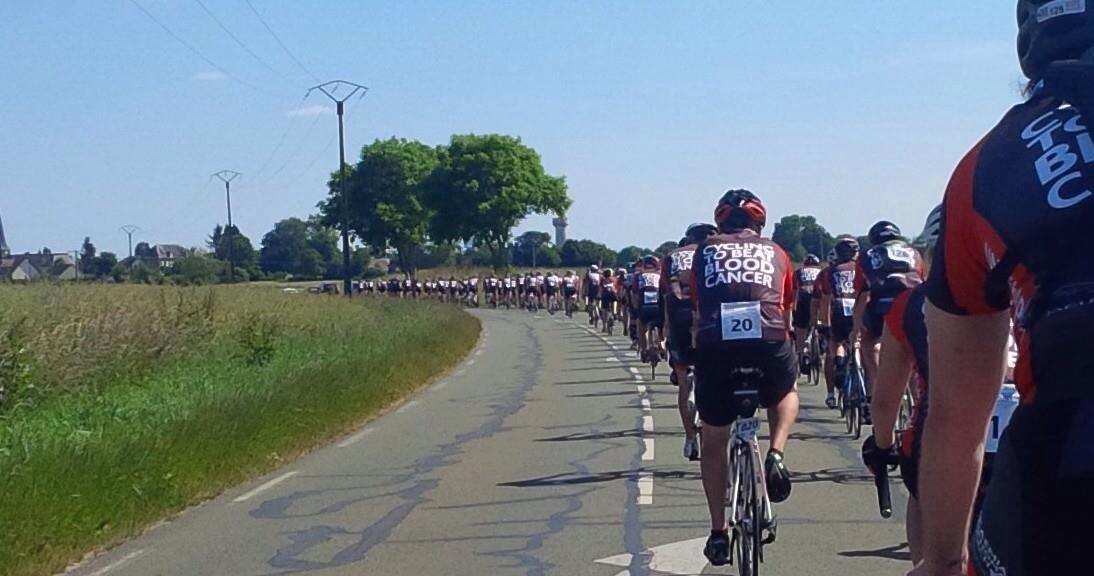
You decide that there can be no better way to get that ‘feel good factor’ than by jumping on your bike and go for a ride, after all you’ve spent weeks if not months wrapped up in cold and wet weather gear, had to clean the muck off the the bike after every ride or looked earnestly out of the window and then at your “summer bike” pondering on whether to face the lashing rain, cold winds, icey roads or snow filed driveways. No, it is time to get the “good weather” gear on, and ride your best bike, it’s going to be brilliant, what could go wrong ?
Rule 1 : Hydration. When riding on a hot day you will need plenty of water, aim to drink 1 litre per half hour and supplement it with electrolytes when the temperature gets above 25 degrees. You may lose 4-6 litres per hour, with the heat sapping your energy faster than you think, dangerous dehydration is always a possibility.
Before I took this leason to heart I would find my mood getting gradually lower and lower until it was very dark, every pedal was an effort, each mile a slog rather than a joy. So now, I make sure I take small but frequent swigs as this is better than one or two large but infrequent gulps. If I start feeling my mood lowering I grab the water bottle, and replenish it with fresh cool water at every stop.
The danger when cycling on a sunny day is that the sweat is being wicked away from you and the breeze keeps you dry….through rapid evaporation, trust me you are sweating ! So use as I mentioned before, use electrolytes as you’ll need to replace salts and minerals during the ride and possibly afterwards.
Okay, so the inevitable part, yes it is okay to have a small beer on a long ride, stay within the law and your own tolerances. I find either a light ale or shandy is best in the heat, however it is far better to earn that beer after the ride, such righteousness is hard to come by.
Rule 2 : Suncream. I don’t really need to say too much, you all know this and have had it beaten into you, but make sure you put it on and re-apply frequently. In particular, a large dose of sunblock on the face, neck and ears, and especially the nose is essential. If you are folically challenged, as i am slowly becoming, wear a bandana, it stops your skull frying or getting a lovely set of tan lines from the gaps in the helmet. A bandana also stops sweat running into your eyes and your neck being burnt.
Rule 3: Sunglasses. My advice is to use as good a quality pair of cycling sunglasses as you can afford. A couple of points to note: (1) look to get polarised lenses as these help you see better any obstacle and the road surface especially in dappled sunlight (e.g riding through tree lined roads); (2) do not skimp on cheap imitations – I face planted the road a few years ago and even under that extreme situation the lens did not shatter and go into my eyes; and (3) wear the arms of the sunglasses outside the helmet straps, not only does it look cooler, in the event that the glasses get knocked (see 2 above) they will fall off (you will want them to do this).
Rule 4: Tyres and Inner Tubes. As it gets hot and rubber expands, any cracks and cuts can become more susceptable to causing punctures. Not as big a deal as the first rules, but always check your tyres (and general safety of the bike), it just makes sense. I would also advise not to put more pressure than you normally do in the tyre, you are not going to go faster, it’ll be just a harder ride experience for a day that should be full of smiles.
Rule 5: Traffic. For some reason during the summer, other road users become a little less patient, and a little less tolerant…it’s either because they have a beer to look forward to, their aircon isn’t working or they as holidaymmakers or visitors and so are less observant of the road, or they are dazzled by the sun or less able to see in the dappled sunlight in the trees. So, expect more of the unexpected, it may be just plain envy that you are having a fantastic ride out in the sun while they are baking in their cars.
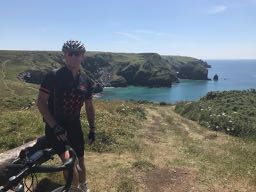
Rule 6: Remember this is Wellbeing. Although not really a rule, when you see come across a special view, vista, flower or one of life’s beautiful moments, stop and take a photo or selfie, then post it, you’ve earnt being a little smug today and these photos will remind you that the hard work you’ve put in to getting there ws worth it, and in the winter you can look back at you achievements with pride and as little motivators to keep going on your journey to fitness and wellbeing.
ciclismo seguro amigos !

Stay out longer this Autumn

The nights are starting to draw in fast as we approach Autumn; on the downside this means less time in the evening or morning to do your midweek training rides, however the beauty of Autumn, the dazzling colours and freshness makes getting out there even more worth it.

I am a huge fan of riding throughout the whole year; Autumn is a very special time, allowing us cyclists to take in the best that nature can show us, and here in the UK it is rarely too cold to go out on your bike.  So there really is no need to pack away thoughts of wonderful rides this time of year, in fact it is perfect as long as you prepare (as you would for a Summer ride).   So what does good preparation look like ?

The Bike:   You do not need to do too much different in preparing your bike for Autumn rides from Summer, however there are a couple of points I’d like to share from my own experiences.

  1. Tyres : If it is damp, slightly lower your tyre pressure, look at your tyre’s pressure range, don’t go too low or you may start to get pinch punctures (the inner tube may get caught between the tyre and the rim). A lower pressure will give you better grip – but note that due to the narrow tyres on most road bikes, we don’t need to worry too much about tread – the chances of aquaplaning are very small; what we do need to worry about is having no cracks, bulges or signs of wear. With there being more chance of rain, or debris on the road due to wind, consider changing your tyres to heavier “puncture resistant” tyres such as my favourite from Continental, called “Gaterskins”, they have slightly higher rolling resistance, but in my humble opinion and experience worth every penny. If in doubt, ask your local dealer, it is a bit like religion, everyone will have an opinion on the best puncture resistant tyre, but it is pretty much the same unless you intend going professional. Here is  a review of the main contenders.
  2. Brakes and Rims: Clean and check after every ride.  Grit or salt in the brake pads not only cause excessive and unnecessary wear and damage to the rim, but you will accelerate the wear on the brake pads.
  3. Chain and gears. As above, clean and lubricate the chain, the cogs, and both the front and rear derailleurs after each wet ride; there have been great developments in the types of lubricant you can choose, or you could just use something like WD-40, or if your budget can cope, a ceramic “wet” lubricant – it depends on what you are prepared to spend, but not taking care of your components means they will wear out very quickly, it is false economy to put this off.
  4. Mudguards. There is a little controversy here; some people hate mudguards, some think they are just the best thing. If you are one of the former, try instead an “ass saver” – a small piece of plastic that attaches to your seat and stops the majority of water splashing up your back. If you are one of the latter, then make sure you fit mudguards that have Secu-Clips, such as on SKS mudguards (frankly I would not use anything else). I highly recommend you read this article before making your choice.
  5. Lights. For a one hour interval training ride in daylight, a good rear light is essential; for longer rides at weekends, take a spare so you don’t get caught out by a low battery (their charge doesn’t last as long in the cold). The sun is getting lower in the sky, so do take a front light, this is more to be seen than to see, so you don’t need to go overboard on the lumens 🙂

Your Clothing.  There are a huge number of articles about what to wear in the Autumn/Winter, but here is my advice.

  1. Several layers are much better than one or two heavy layers. Wear a good base layer (don’t giggle, but in my case a string vest is superb), then a jersey, followed by a long sleeved wind/shower proof jacket. If you do not want to wear a jacket, i.e. no signs of rain, then there are a number of alternatives such as the famous Gabba (a groundbreaking windproof top), a good merino wool jersey, or a windproof gillet   If you are intending using short sleeves, take/wear a good pair of arm warmers, and likewise long legged tights/bibs for the legs or at least leg/knee warmers.
  2. Unless you are naturally gifted with warm hands, wear long fingered gloves – there is a huge range on the market, there are even ranges designed for different temperatures!
  3. To keep your feet warm, wear overshoes.  These are covers that fit over your normal cycle shoe and are  water and windproof, but only to an extent.  There are heavy duty versions that will keep your feet dry and warm for longer, but if you want a 100% guarantee then you’ll need to invest in proper winter cycling shoes, which can be expensive.  I have found that a cheaper option is to stick with overshoes and get some cycling socks that have two layers, separated by a waterproof membrane.
  4. For cycling glasses, buy ones with interchangeable lenses so that you can swap the dark lens for sunny days with a clear or yellow lens for lower light conditions.
  5. One of my other “go to” items is the neck warmer. These are highly versatile; not only keeping your neck warm, but can be pulled up over the chin keeping that warm, or even worn on your head as a cap if you are for instance “folically challenged”.
  6. Finally, please keep visible, wear a “high viz” gillet (wind stopper) or clothing with high viz strips.

So keep riding through the Autumn.  The feelings of wellbeing are enhanced as you feel more in touch with the changing world around you; we are after all creatures born out of nature; it is unnatural to confine ourselves indoors.   Get out and ride, cycle for (mental and physical) health; there’s never a better time of the year than now.


Group Riding – Fun and Efficient

Riding in a group is not only fun but highly efficient; it should come as no surprise, but air has a weight, and you need to push 100KG of air every 150 meters, so slipstreaming (draughting) someone just ahead of you is a great way to reduce your effort (as much as 30%).

This is the idea of the peloton, and you may have seen in time-trials and the Tour de France how the professional cyclists ride so very close behind each other, taking turns to protect each other (and their GC riders) from the wind.

Considering safety, although contentious and likely to stir the ire of many a car driver, riding two abreast is not only permissible in the Highway Code, but if there are more than say four of you makes overtaking your group much safer (the overall road distance needed for the overtake manoeuvre is reduced by several bike lengths).  If you are a novice rider who is unsure of their ability, I recommend single file unless you are practising with a seasoned cyclist who can take charge when the need arises to go from 2 abreast to single file (e.g. heavy traffic or narrow road).    When 2 abreast, keep talking to each other about how and when they want to change position, etc and start with one handlebar’s distance between you.

Riding in a group requires concentration and diligence of other around you, it needs practise.  If you are draughting each other as a group, the front person peels off (after looking over their right shoulder) and joins the back (the side they peel off depends on side wind direction), the next person takes over, without increasing the pace, and so on.

Tips

    • Don’t look at the back wheel of the person in front of you, look ahead and concentrate
    • Never overlap wheels (half wheel) with anyone, just in case they, or you, need to swerve to avoid an obstacle or pothole, overlapping your wheels is dangerous, potentially causing you and others to crash.  It’s also considered poor form.
    • Until you are proficient, keep a minimum distance of one bike length between you and the person you are following – you can still get the draughting effect  up to  3 metres behind the other person
    • If you are moving at less than 10 mph (16kph) then the draughting becomes negligible.
    • When you are on the front of the group, shout out any obstacles, potholes, gravel, etc as people behind you may not otherwise see those obstacles in time to avoid them.
    • If you get too close to the person in front of you, don’t brake abruptly, there’s probably someone close behind you that may not react as quickly as you !
    • Riding in the group is an art,  and a great way to get a breather if you are struggling and someone in your group is gracious enough to let you draught them.

For more information, refer to British Cycling’s great video on this topic


Cadence is King

Welcome to another blog to help you gain sustainable fitness and wellbeing through road cycling.

Previously we talked about the alternatives to lycra, riding in the rain, saddles, etc. Hopefully you have enjoyed our musing and our suggestions.

Today we talk about the importance of a good pedalling technique. Pedalling is seldom taught, but as it is the means to get us from A to B, so we need to get it right.

Starting with the basics. Pedals are attached to cranks, which are connected to the front cog. The cranks turn the back wheel (via the cogs and chain) and hence we get forward motion. Some bikes have gears, some don’t, let’s not worry about that just yet.

The most common problem is pedal “stamping”, which is not only hard work, but also inefficient (you are applying power only a fraction of the time). This leads to knee pain and muscle cramps, especially over longer distances. We therefore need to smooth our pedalling, applying constant pressure across the entire stroke. A good way to correct stamping is to pretend you are wiping something off your feet when the pedal is at the 6 o’clock position.

The next problem is pedalling too slowly. You may have experienced when cycling that when reaching hills or inclines you need to use all your energy and grind your way up, or just get off and push. This can be corrected by learning to spin the pedals faster than you probably do now. We call this pedal speed the cadence, and when done right, it allows you to comfortably spin your legs without straining muscles or wearing yourself out. There is no right or wrong speed; for those of you who have done spinning classes, you are probably used to spinning at over 100RPM, however in real life, it is very tough to maintain that speed unless you have extremely good cardiovascular fitness.

To find your right cadence, start off by only the gears on the back wheel. Select a gear where the chain is positioned on the middle cog. Go for a gentle ride on a flat road and spin your legs in that gear. Then select the next harder gear (smaller cog) and continue. How does that feel? Next go back to the original cog, and select an easier gear (larger cog). How does that feel?

Depending on your preferences and fitness you should be able to find a gear that allows you to comfortably spin without too much exertion.

Try maintaining this gear and cadence on your next training ride, and when you see a hill, progressively select easier gears to keep your pedal speed constant.

Once you have mastered your pedalling technique you’ll be surprised how much easier hills and slopes become. You will keep your momentum and no longer have to grind unless it is a particular steep hill.

We’ll give you some hints and tips on the importance of getting the three contact poins correct and the impact of when we get it wrong. how to climb hills in the next blog. Until then, enjoy your training, keep those legs spinning and get your grn factor back.

ciao, Grant

In Praise of Saddles (it’s not pants!)

The most common complaint I hear about is a sore backside or “numbness” from cycling.   This can often lead to demotivation and reluctance to get out on your bike, in fact I know a few people who have jumped on a bike for the first time and after 20 miles swear they will never do that again. The causes of these “pain in the backside” issues are usually caused by one or a combination of a poorly set up saddle, the wrong type of saddle, wearing inappropriate clothing or simply riding too much too soon.
Let’s looks at each of those in turn.

Firstly, the saddle position.  It should be horizontal, not tipping back or tipping forward, but level. If you set it so that the nose (the front) is pointing down you will tend to slide down, not only putting strain on the arms and wrists, but you will constantly try to slide back, rubbing the inside of your thighs; like-wise if the nose is pointing up then your nether regions get a pounding, so make it level.  The saddle also needs to be at the right height for you, there are numerous rules of thumb and mathematical formulae, such as setting the height 109% of your inside leg measurement (from the top of the saddle to the pedal axle when in the 6 o’clock position) – a reasonable starting point to begin with, however, if you are just starting out and don’t have the budget to get a professional bike fit I recommend a visit to your local bike shop who can get you at least set up there or thereabouts and correct any issues.  So why is is saddle height important? You will find that if the saddle is too low, your knees will tend to push out, you will lose power and this can cause knee strain (the knee should move up and down with minimal lateral movement). If it is too high, you will need to rock your hips at the bottom of each stroke, and this movement is likely to cause back pain and again knee pain.   Another indication of a saddle being too high is that when your foot is on the pedal at the bottom of the stroke it should be level, if it is pointing down (tiptoeing) the saddle needs to be dropped.  If you are out for a ride and want to change the saddle height, my personal rule of thumb is that fine adjustments should be done in no more than 3mm increments.   Bottom line, see your local bike shop or professional fitter.

Wrong saddle type. So, when you look at modern road saddles they look more like arrow heads than the saddles of days gone by, but it really is horses for courses.  A padded saddle is great for those gentle rides to the shops or picnic, you’ll see some padding on off-road and mountain bikes, but for road and touring bikes, you need a solid saddle.

Why ? you may ask.  The answer is that road saddles are designed on the premise that cushioning comes from a combination of the bike frame, the wheels, the saddle stem and in higher priced saddles, titanium rails, but not the saddle seat itself.   Secondly, the speed at which you pedal is much higher on road bikes, and the rides generally longer in time/distance than say commuting, meaning that you should have as little contact and resistance as possible between you and the saddle, thereby avoiding abrasions or chaffing inside the thigh, so yes, less or more!  In addition, the market has matured such that there is a huge range of saddle designs; including those that have a

cut-out running down the middle, or long nose, or short nose, how flexible you are, and because the width between your sit bones (the technical term is the ischial tuberosity bones) which are the bones that bear your weight when sitting is key, the choice of saddle design is important. Note that this will be different between men and women (a women’s sitting bones are wider apart than the man’s).

A professional fit or use of for example Selle’s IDMatch system (at good local bike shops) can measure the width and help point you in the right direction.   If it sounds confusing, don’t fret we can help and we will also point you towards your local bike shop to ensure you get the right choice (good dealers will lend you a “test saddle” you can use to check if it is right for you).

Inappropriate pants. To be straight upfront, all pants are inappropriate. In my blog on Lycra and the alternatives, I made the point that cycle shorts are so effective because not only does Lycra wick away sweat, dry quickly, but lycra shorts are designed to have no seams, with padding that is usually made from an anti-bacterial material, so gives you the optimum comfort and fit.  If you wear pants with them, you will sweat, you will chaff, you will get sore. To those of you thinking of putting off Lycra to begin with, wear loose fitting shorts or jogging leggings, but rather than your normal pants, get some padded pants from your local bike shop, an online store or shop such as Halfords. You won’t regret taking this advice.  Bottom line (forgive the pun), as soon as you can, get into lycra shorts, avoid bright colours, black is best.  For the ladies, try brands such as Velovixen, that have in-built skirts, other brands such as Pearl Izumi and Santic have similar designs.

Riding too much too soon. This is the killer; I cannot tell you how many times I hear (also from young fit people) stories of woe, where they bought or borrowed a bike for a charity ride, or simply to try out cycling as a means to get fit, and after 20 miles couldn’t sit down on the saddle and were sore for days. This is totally unnecessary. When I started cycling I limited myself to 10 miles, and stayed at that level for weeks before trying to do 20 miles. The first time I did 20 miles, I knew I’d done the extra distance/time in the saddle, but having taken the time to build up to that distance, I avoided saddle soreness.  Before I forget, for longer rides use a good quality chamois cream to avoid chaffing, it makes a huge difference if you are riding more that 50 miles.   You may prefer to apply it before any of your shorter rides, it might seem weird at first, but go for it, you’ll feel the difference after the ride.

In conclusion, assuming you have the right saddle and it is fitted correctly, you wear the right clothing, then gradually build stamina “in the saddle” it is easily possible to do a 4 hour, 5 hour, even 9 hour ride, and with comfort.   You just need time in the saddle, the body adapts in the same way as walking a long distance or running a marathon, the body is an amazing thing!  The good news is that our plans start with just 20 mins in the saddle at low intensity, and you slowly build up time and distance. This progressive approach guarantees success, minimising the chances of developing soreness where it hurts most.

Want to know more, contact us at www.cycleforfitness.com, and when it comes to saddles, get back your grin factor!

Cycling in sunshine: the pleasures and perils


In one of my previous blogs I wrote about cycling the rain, with a few hopefully words of wisdom based on my own experiences of the do’s and don’ts. Sitting here basking in 30 degree wall to wall sunshine, it would be remiss of me not to address the similar pleasure and perils of cycling during a hot summer’s day.

So to begin with, you draw the curtains (or whatever) and smile at a cloudless blue sky, the birds are singing, bees are humming and the world is spinning on a slightly more relaxed axis. Life is good.

What better way to enhance that feel good factor than by jumping on the bike for a ride, after all you’ve spent weeks if not months wrapped up in cold and wet weather gear, had to clean the muck off the the bike after every ride or looked earnestly out of the window and then at your “summer bike” pondering on whether to face the lashing rain, cold winds, icey roads or snow filed driveways. No, it is time to get the summer gear on, and ride your best bike, it’s going to be brilliant, what could go wrong ?

Rule 1 : Hydration.  We talked a little about this on our Calais to Montpellier adventure entitled “16 Days in France”, where we certainly learnt a lot of lessons, and perhaps after reading this you’ll stop by that slightly tongue in cheek prose. So, rule number one is that when riding in summer you will need plenty of water, aim to drink 1 litre per half hour and supplement it with electrolytes when the temperature gets above 25 degrees. You may lose 4-6 litres per hour, with the heat sapping your energy faster than you think, dangerous dehydration is always a possibility.

Before I took this leason to heart I would find my mood getting gradually lower and lower until it was very dark, every pedal was an effort, each mile a slog rather than a joy. So now, I make sure I take small but frequent swigs as this is better than one or two large but infrequent gulps. If I start feeling my mood lowering I grab the water bottle, and replenish at every stop.

The danger when cycling on a sunny day is that the sweat is being wicked away from you and the breeze keeps you dry….through rapid evaporation, trust me you are sweating ! So use as I mentioned before, use electrolytes as you’ll need to replace salts and minerals during the ride and possibly afterwards.

Okay, so the inevitable part, yes it is okay to have a small beer on a long ride, stay within the law and your own tolerances. I find either a light ale or shandy is best in the heat, however it is far better to earn that beer after the ride, such righteousness is hard to come by.

Rule 2 : Suncream. I don’t really need to say too much, you all know this and have had it beaten into you, but make sure you put it on and re-apply frequently. In particular, a large dose of sunblock on the face, neck and ears, and especially the nose is essential. If you are folically challenged, as i am slowly becoming (no comments from the back), wear a bandana, it stops your skull frying or getting a lovely set of tan lines from the gaps in the helmet. A bandana also stops sweat running into your eyes and your neck being burnt.

Rule 3: Sunglasses. My advice is to use as good a quality pair of cycling sunglasses as you can afford. A couple of points to note: (1) look to get polarised lenses as these help you see better any obstacle and the road surface especially in dappled sunlight (e.g riding through tree lined roads); (2) do not skimp on cheap imitations – I face planted the road a few years ago and even under that extreme situation the lens did not shatter and go into my eyes; and (3) wear the arms of the sunglasses outside the helmet straps, not only does it look cooler, in the event that the glasses get knocked (see 2 above) they will fall off (you will want them to do this).

Rule 3: Tyres and Inner Tubes. As it gets hot and rubber expands, any cracks and cuts can become more susceptable to causing punctures. Not as big a deal as the first rules, but always check your tyres (and general safety of the bike), it just makes sense. I would also advise not to put more pressure than you normally do in the tyre, you are not going to go faster, it’ll be just a harder ride experience for a day that should be full of smiles.

Rule 4: Traffic. For some reason during the summer, other road users become a little less patient, and a little less tolerant…it’s either because they have a beer to look forward to, their aircon isn’t working or they as holidaymmakers or visitors and so are less observant of the road, or they are dazzled by the sun or less able to see in the dappled sunlight in the trees. So, expect more of the unexpected, it may be just plain envy that you are having a fantastic ride out in the sun while they are baking in their cars.

Rule 5:  Remember this is Wellbeing.  Finally, although not really a rule, when you see come across a special view, vista, flower or one of life’s beautiful moments, stop and take a photo or selfie, then post it, you’ve earnt being a little smug today and these photos will remind you that the hard work you’ve put in to getting there ws worth it, and in the winter you can look back at you achievements with pride and as little motivators to keep going on your journey to fitness and wellbeing.

I hope these little snippets are of use to you, and happy to expand on them if you’d like to contact us www.cycleforfitness.com.

Lycra and the alternatives….

The first time I put on lycra in order to ride a bike was back in 2010, and it was a little daunting to say the least.

My rides at that time were limited to a 45 minute stretch over 10 miles around a few roads close to home. Because I was at the start of my personal fitness journey, the sight of me riding down the high street in lycra drew a certain degree of ridicule from people that I knew. I didn’t care, I thought that it was better to have your friends poke a little fun at you rather than being sat on the couch doing nothing, slipping what seemed inevitably into type 2 diabetes.

I tried to compensate by wearing a bright yellow waterproof jacket to cover up, but unless it was below 5 degrees I became overheated and uncomfortable pretty darn fast.

However I soon lost weight and my confidence soared. As a result of this experience, all I can say to those people worried about how they will look, there are some exceptionally good alternatives to Lycra. I hope the below will give you a few suggestions and help ease your mind on what to wear for your first few rides.

Before we explore the alternatives, why does lycra remain the stalwart clothing material of choice for cycling? The reason is that it is simply the best material for exercise (which involves lots of stretching), keeping you cool in the summer, warm in the winter, dries super fast if you encounter any showers, and for cycling is aerodynamic, it doesn’t flap around slowing you down.

In considering alternatives, tweed and denim is out, but thankfully the materials used for cycling clothes expanded dramatically over the last few years; you can now buy all kinds of garments in different materials that equal or surpass Lycra in certain circumstances. If you are worried about having to wear lycra, my suggestion is to wear clothing made from synthetics such as polyester or nylon, both are good for hot sunny days, however if the budget can stretch a little further my personal choice would be a natural fabric such as merino wool, or clothing that use a combination of both lycra and merino; at the high price range end you could opt for bamboo for a jersey, which is good for people with sensitive skin due to its natural anti-fungal and anti-bacterial properties, but as I mentioned before, at a cost. Whatever you choose, in addition to Lycra, there’s a lot of very stylish cycling clothes out there that are visually appealing irrespective of size, and they feel fantastic to wear.

Therefore, you do not need to be a slave to Lycra. If you are considering starting out on your journey to fitness and wellbeing through road cycling, my advice would be :

1. Wear lycra shorts (or bibs or leggings), and a merino jersey to give a more casual look that feels great and performs well in most conditions of heat, cold and wet.
2. In terms of colours, wear black or pastels with a little splash of colour and a tasteful motif. Less is more. Avoid white shorts.
3. Unless you ride for a team, stay away from the “team jersey” look.
4. In terms of what to wear under the shorts, the golden rule is nothing…that may seem counterintuitive, but the padding on most shorts is anti-bacterial and the wicking will keep you dry in the most important area and prevent you getting sores and tenderness. Trust me on this.

At Cycle for Fitness, as part of the service we will provide you with a telephone consultation that almost other things, will cover what you need to wear and what to avoid. Subscribe to www.cycleforfitness.com now and we can begin your journey.

Palace to Palace 2016

Disclaimer :  this is added as personal content; any reference to corporations , either inferred or implied is unintentional.

A brief video of the 2016 Palace to Palace ride in support of the Prince’s Trust.


A short ride around the coast of west Cornwall

The purpose of this video is to offer a flavour of cycling in wild west Cornwall.  This was a training ride for “Ride Across Britain”;   It gets very fast after 2 minutes of a steep climb, if you have a nervous disposition, don’t watch; no video enhancements or speeding up the video have been made, it’s all powered by my legs.  Turn up the volume and enjoy….. 🙂


16 Sundays in France (2012)

This is the story of two old fools, les ‘deux fous’ (and one fous’ long suffering wife) on bikes who followed in the pedal steps of Rob and Jon, pioneers of ‘Wine-ding down through France’ from Calais to Montpelier. Fous número un is Grant; more than ably assisted by his wife Kirsten, and fous número deux is Ben, Grant’s brother. Neither have a great deal of experience in long distance cycling but the gap in experience is made up for in bulldog spirit. Both are closer to 50 years of age than would ideally be the case for this sort of endeavour. It would also be fair to say that Bradley Wiggins would not have to fear losing his place on team Sky to either of these ‘athletes’.

Each Day plus a few musings on health, preparation and the Epilogue can be found on the troisfous.com site.